|
In this tutorial you will be creating a simple floral divider in Adobe Illustrator. Below is a preview of what you'll be making.  If you would like to download the graphic seen above, click here! (Graphic in CMYK colour mode for printing) How to create the Vines Step 1. First, we'll create a new document in Adobe Illustrator. Width: 612 pt Height: 216 pt Units: Points Colour Mode: CMYK Raster Effects: High (300 ppi) Then click Create. 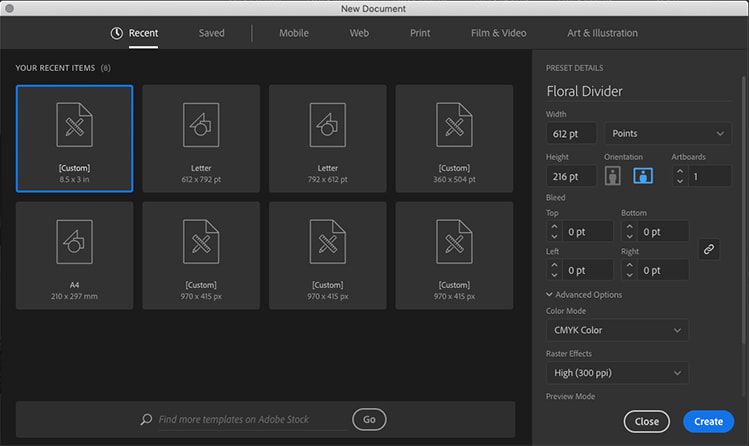 Step 2. Using the Pen Tool draw a wavy line, similar to below:  Step 3. Go to Window > Stroke and increase the line's Stroke to 5 pt. Go to Window > Gradient then give the stroke a gradient. In the Gradient Panel make sure to click the third box next to Stroke: , "Apply Gradient Across Stroke" (yellow arrow points to this option). Use these colour values for the gradient: 1. C=61 M=24 Y=98 K=6 2. C=47 M=4 Y=98 K=0 3. C=72 M=47 Y=93 K=48 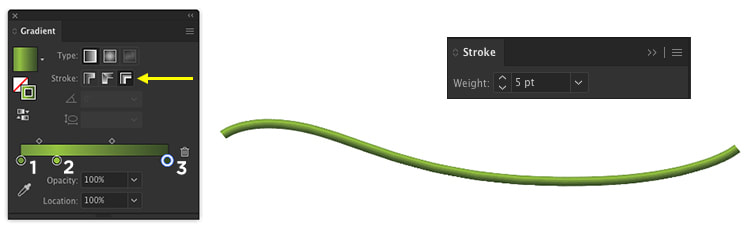 Step 4. To give the vine some definition, go to Window > Stroke and select Width Profile 5 under the Profile drop down menu. With the path still selected, next to the drop down arrow for Profile in the Stroke Panel you will see this icon to Flip Along (pointed to with the red arrow below) and. Press it once to give a result of a heavier line to the left which thins out to the right. 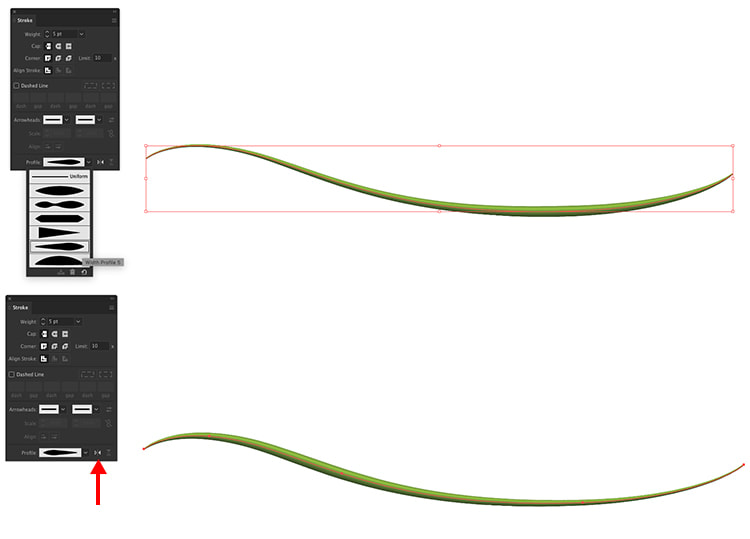 Step 5. Following steps 2-4, add in some paths with a Stroke Weight of 2 pt, and the same Profile settings to create shoots off of the main vine. 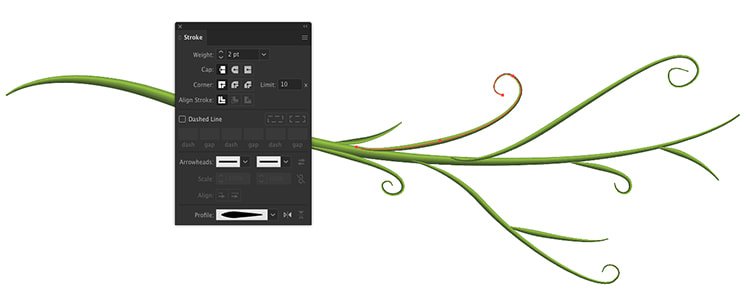 Step 6. We want to bring the main vine to the front, select it using the Selection Tool and right click on the path. Select Arrange > Bring to Front. 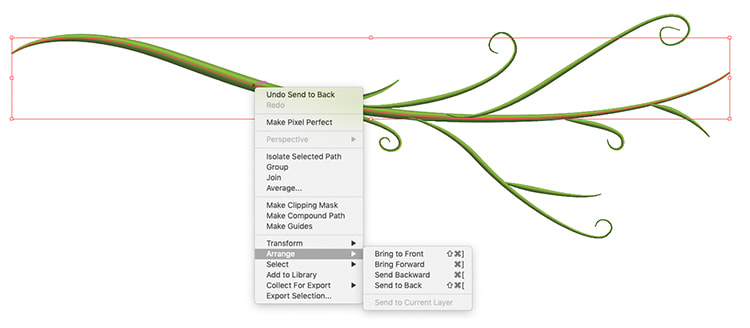 Step 7. Let's reflect all vines to create a longer divider line. Using the Selection Tool select all vines, and go to Object > Transform > Reflect. In the Reflect Window, choose Vertical, then Copy. 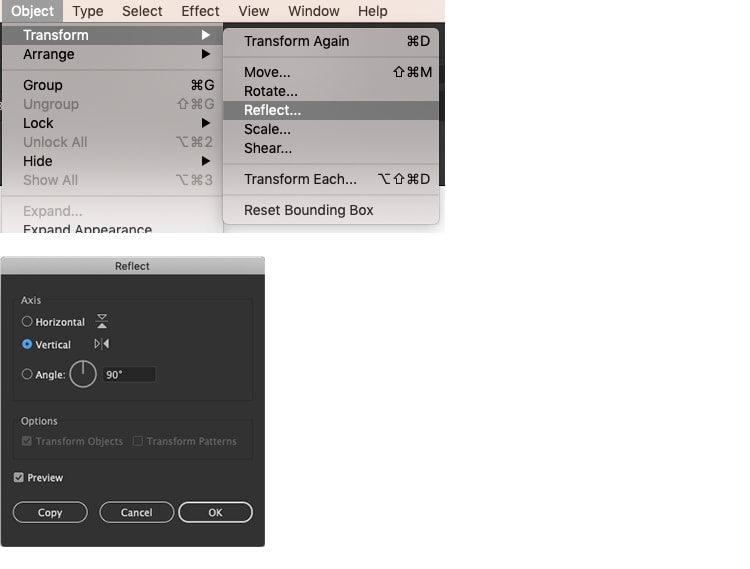 Step 8. Move your copied vines to the left, and change up some of the smaller vines if you don't want it to be entirely symmetrical. 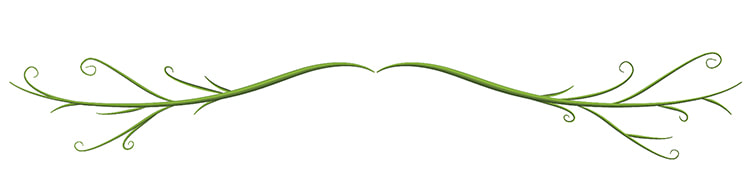 How to create the Flower Buds Step 1. Using the Pen Tool create a shape like below, this will form half the base of the flower bud.  Step 2. Go to Object > Transform > Reflect to open the Reflect Window. 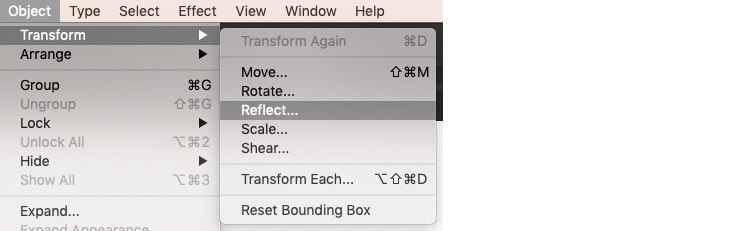 Select Vertical, then click Copy. 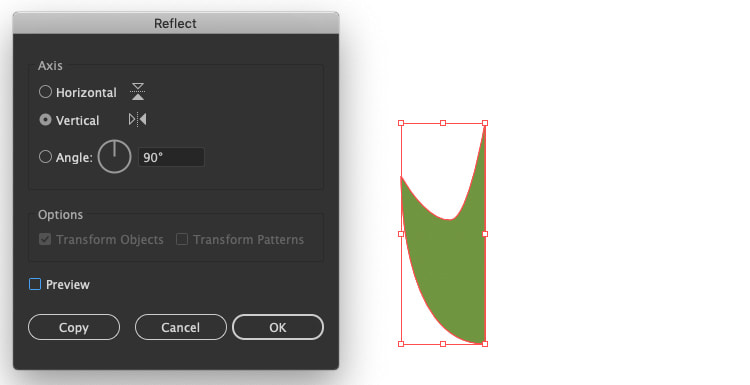 Step 4. Align both shapes together, then using the Selection Tool, select both shapes and in the Pathfinder Panel (Window > Pathfinder), click Unite. This is the first option under Shape Modes.  Step 5. Now we're going to give the base a gradient fill. If the Gradient Panel isn't already on your screen, go to Window > Gradient and add a Radial Gradient to the fill using these values: 1. C=61 M=24 Y=98 K=6 2. C=69 M=38 Y=98 K=25 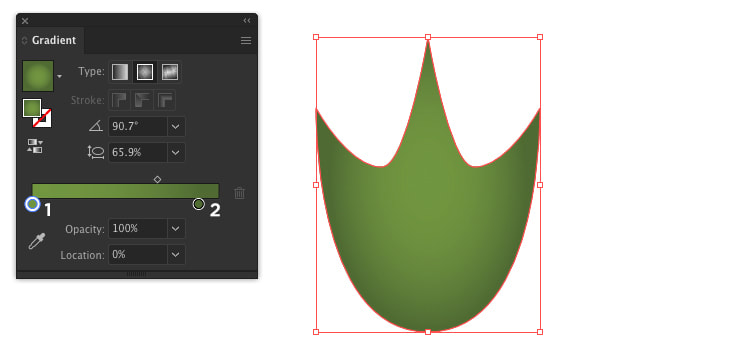 Step 6. Using the Pen Tool draw an oval shape like below and fill with a Radial Gradient using these values: 1. C=0 M=19 Y=11 K=0 2. C=0 M=45 Y=24 K=0 You can duplicate these shapes and to give a yellow flower bulb, replace the above colour values with: 1. C=6 M=0 Y=66 K=0 2. C=0 M=26 Y=100 K=0 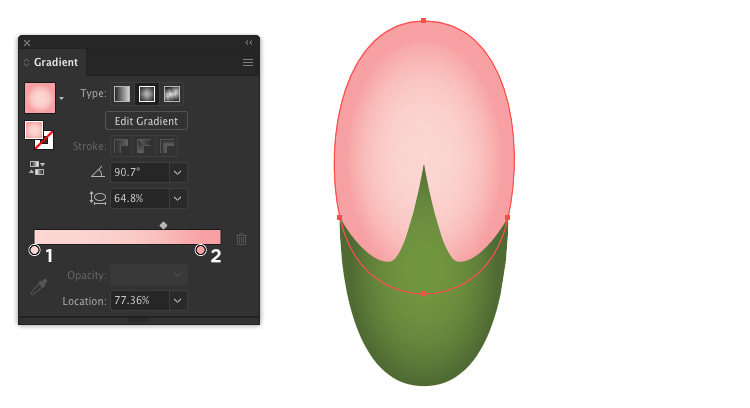 Step 7. Duplicate, rotate and place the buds along different vines on each side. 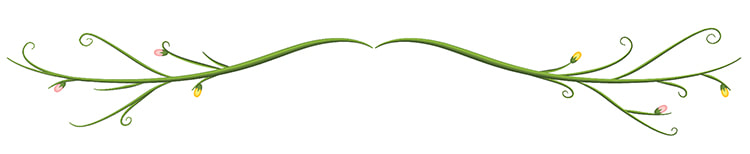 How to create the Leaf Step 1. Select the Pen Tool and draw a leaf shape similar to below. Open the Gradient Panel and give the fill a Linear Gradient that's angled going from top left to lower right, light to dark, using these values: 1. C=47 M=4 Y=98 K=0 2. C=61 M=24 Y=98 K=6 3. C=69 M=38 Y=98 K=25 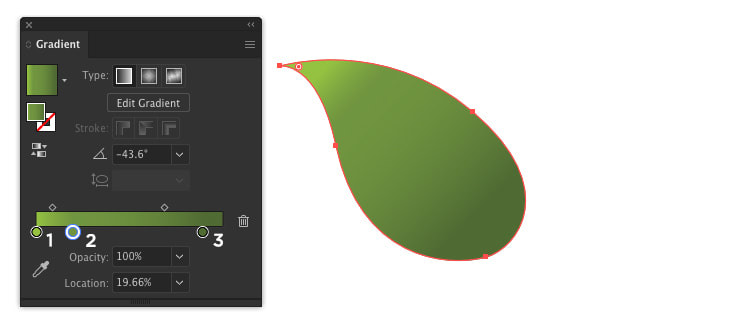 Step 2. To add veins to the leaf, use the Pen Tool with a Stroke Weight of 0.75 pt. Give the stroke a colour value of: C=72 M=47 Y=93 K=48. In the Stroke Panel, change the Profile to Width Profile 4 and Flip Along (as we did in Step 4 of creating the vines earlier) to have the line thin out toward the top left. Repeat this step for the smaller veins which branch off and change their Weight to 0.5 pt. 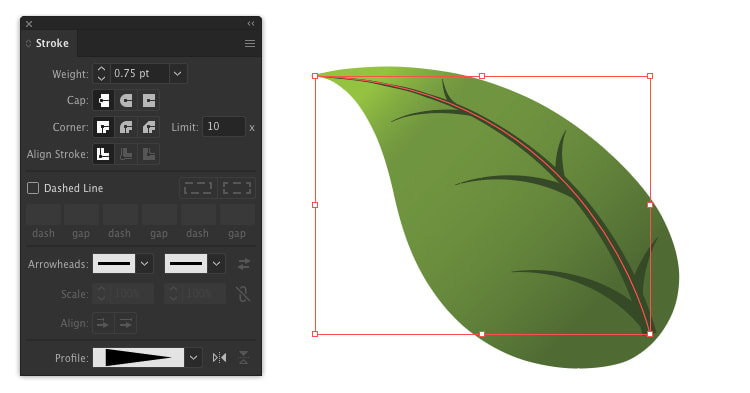 Step 3. Next, let's select all the vein paths (excluding the leaf) and go to Object > Expand Appearance. 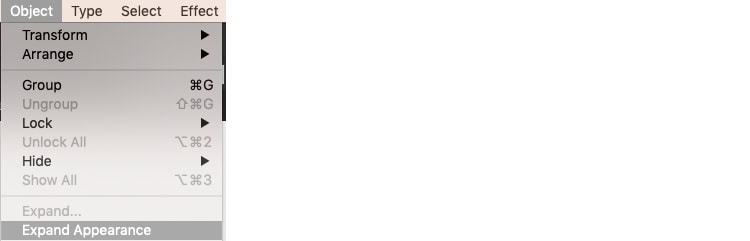 With all the veins still selected, in the Pathfinder Panel select Unite (the first option under Shape Modes). 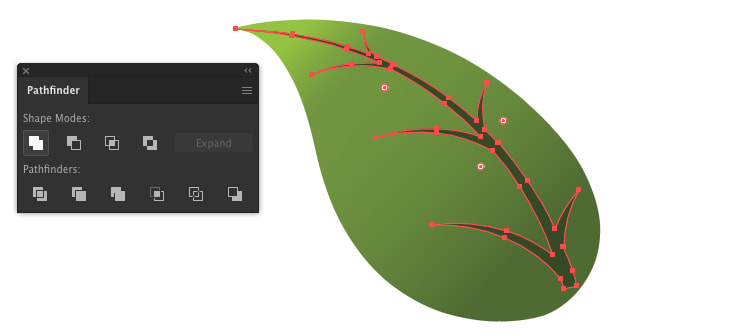 Step 4. Group the veins with the leaf shape, then duplicate, resize, and rotate the leaves to different places along your vines. 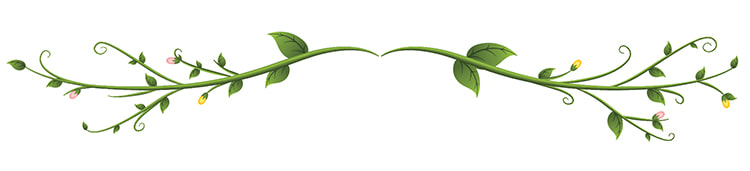 How to create the Pink Flowers Step 1. Draw a shape like below using the Pen Tool and fill with a Linear Gradient using these values: 1. C=0 M=67 Y=32 K=0 2. C=0 M=84 Y=32 K=13 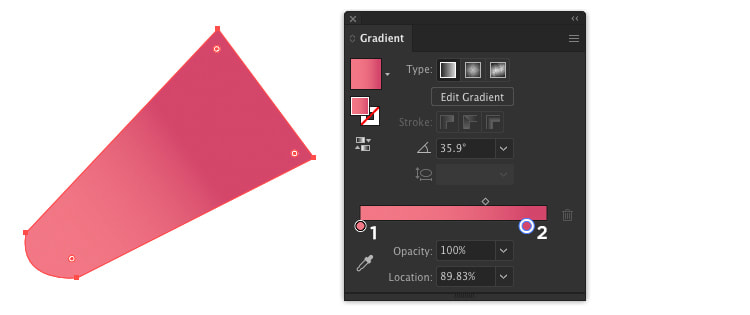 Step 2. With the Pen Tool still selected, draw the first petal, similar to below using these values for a Linear Gradient fill: 1. C=0 M=19 Y=11 K=0 2. C=0 M=45 Y=24 K=0 3. C=0 M=67 Y=32 K=0 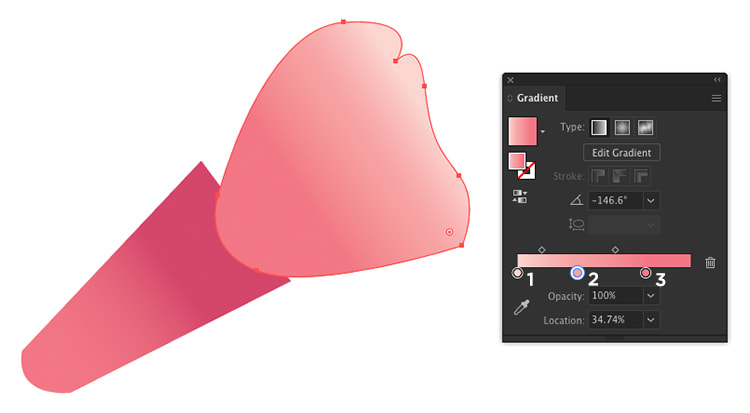 Step 3. Using the Pen Tool, draw a smaller petal to the left and give it a Gradient Fill with these values: 1. C=0 M=84 Y=32 K=13 2. C=0 M=67 Y=32 K=0 3. C=0 M=45 Y=24 K=0 4. C=0 M=19 Y=11 K=0 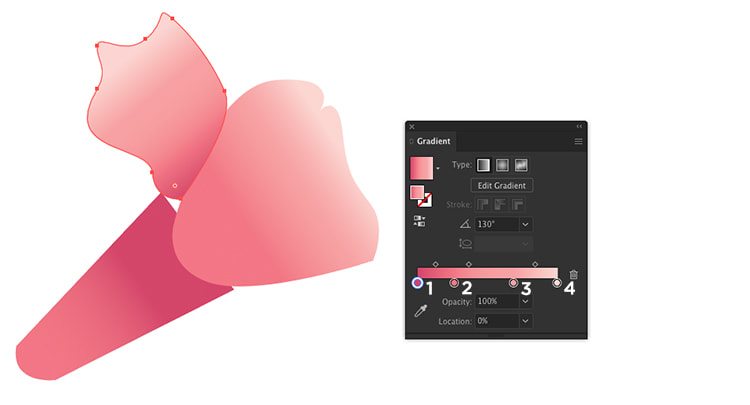 Step 4. Draw another petal to the right, fill with a Linear Gradient using these values: 1. C=0 M=84 Y=32 K=13 2. C=0 M=67 Y=32 K=0 3. C=0 M=45 Y=24 K=0 4. C=0 M=19 Y=11 K=0 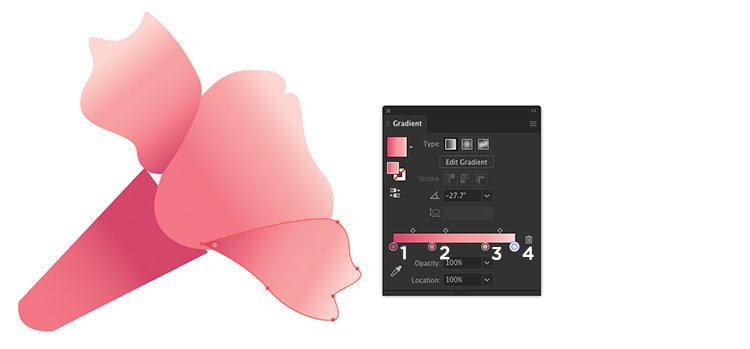 Step 5. Let's draw another petal to the far right with the Pen Tool, and fill with a Linear Gradient using these values: 1. C=0 M=84 Y=32 K=13 2. C=0 M=67 Y=32 K=0 3. C=0 M=45 Y=24 K=0 4. C=0 M=19 Y=11 K=0 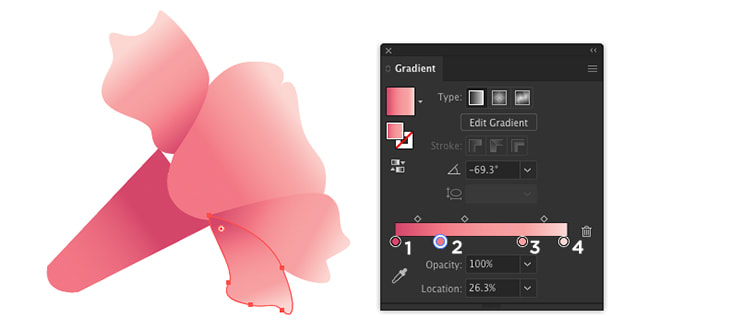 Step 6. To add some pollen stalks, draw some triangular shapes with the Pen Tool and give them all a Linear Gradient using these values: 1. C=0 M=67 Y=32 K=0 2. C=0 M=84 Y=32 K=13  Step 7. Now we're going to add the final petal at the front, and give the fill a Linear Gradient using the values: 1. C=0 M=19 Y=11 K=0 2. C=0 M=45 Y=24 K=0 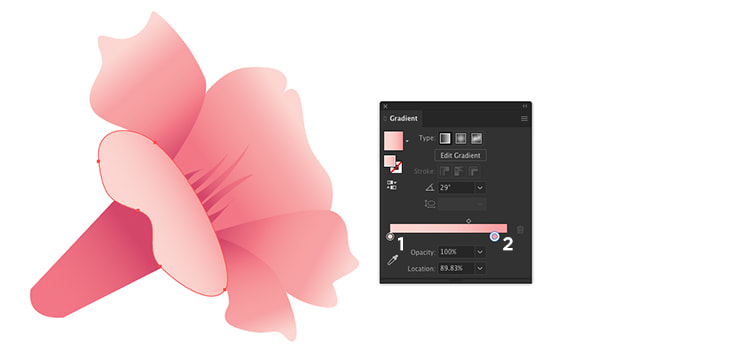 Step 8. To finish off the pink flower, draw a green base like below with the Pen Tool and use a Linear Gradient for the fill with these values: 1. C=61 M=24 Y=98 K=6 2. C=69 M=38 Y=98 K=25 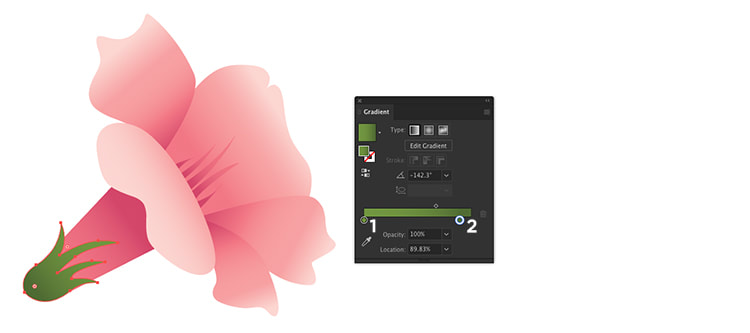 How to create the Daisy Step 1. To create the long petal, use the Pen Tool to draw an oval as shown below and fill with a Radial Gradient using these values: 1. C=0 M=0 Y=0 K=0 2. C=3 M=8 Y=17 K=0  Step 2. Next we'll create the centre of the flower with a circle filled with a Radial Gradient with these values: 1. C=0 M=7 Y=86 K=0 2. C=2 M=35 Y=86 K=14 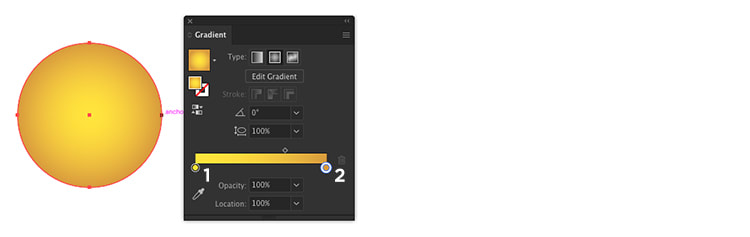 Step 3. Align the petal with the centre of the yellow circle, with the base of the petal slightly overlapping the yellow circle. Now, with the Selection Tool select the petal only, then using the Rotate Tool hold down Option on your keyboard and click once in the centre of the yellow circle. A cyan marker will appear where you click and the Rotate Window should open 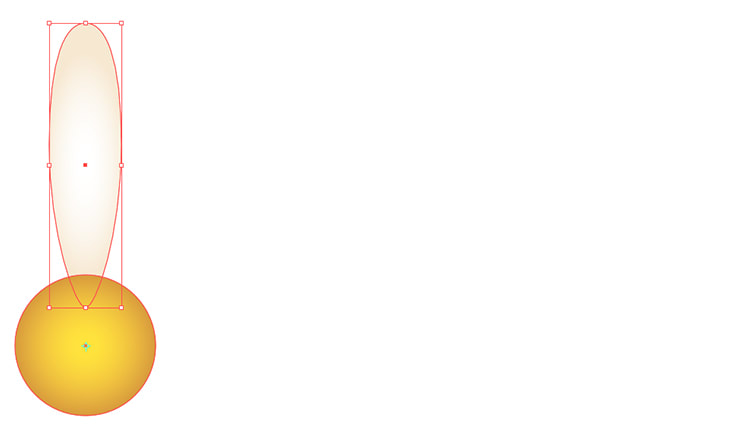 Set the angle to 20° and click Copy. 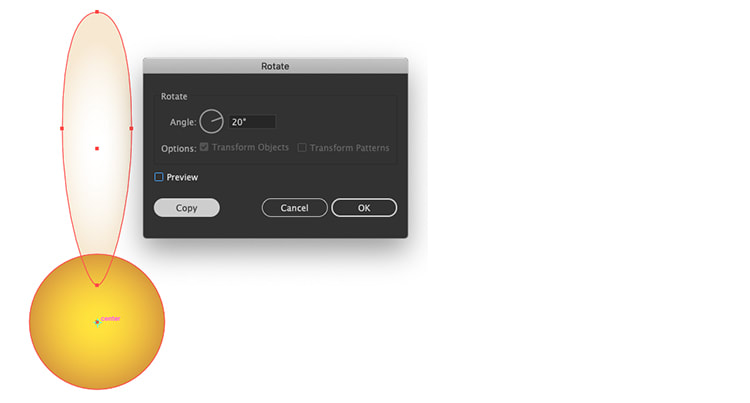 Step 4. Press Command + D on your keyboard repeatedly until the petals are all around the edge of the yellow circle, as shown below. Group all these elements and move the flower to one side.  Place all the elements together Add the pink flowers to the smaller vines near the flower buds. Duplicate the daisies and vary their size, you can also change the petal gradient colours to give some variety, place them in the centre and we're done! Comments are closed.
|
Contact UsLocal: 604-270-8682
Toll-free: 1-800-663-8273 Weekdays 9AM – 5PM
|
Visit Us#7 - 12840 Bathgate Way,
Richmond, BC, V6V 1Z4 |
|
|